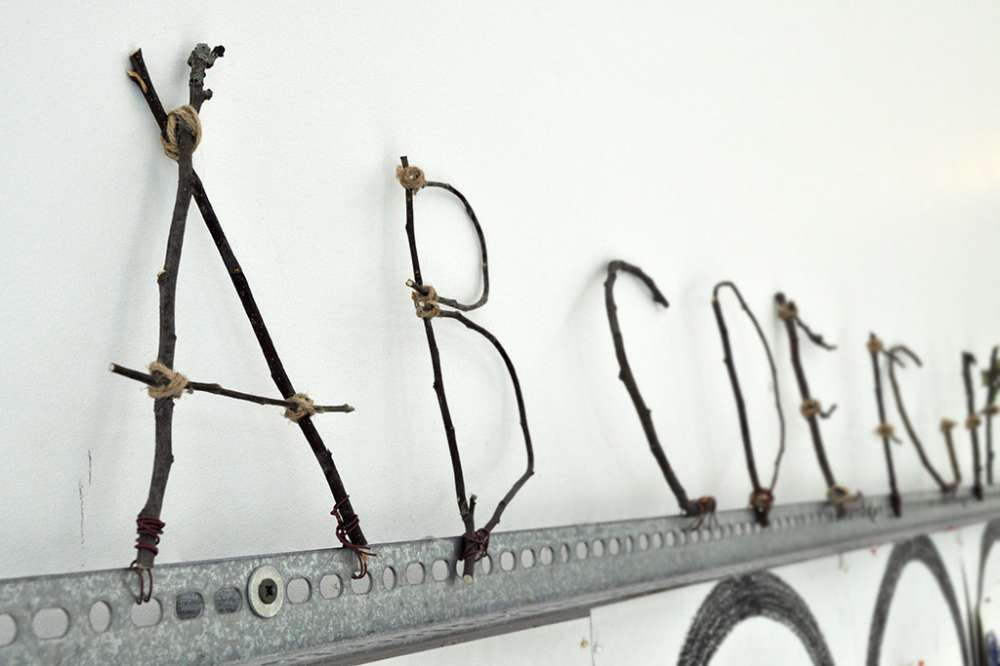
It’s amazing how 26 little letters are all you need to make thousands of words in the English language! An exhibition at the Carle Museum, The Art of Eric Carle: From A to Z, made us think a lot about the alphabet. We made our own letters — with twigs! — to decorate the studio. It's easier to do this project in the fall, when the leaves have fallen, or started to, and it's a terrific way for your kids to create seasonal decorations for your own home.
This project requires both pruning shears and a hot glue gun, so it's suitable only for children age 10 and up, and adults should definitely supervise.
What You'll Need
- a variety of branches and twigs in different lengths and thicknesses (your little ones can help collect these!)
- pruning shears
- twine
- hot glue gun
- pencil or marker and sheets of copy paper
- rubber bands and round objects like a jug or rolls of packing tape (for making round letters)
How to Make a Branch Alphabet

Step 1: First, have your children collect branches and twigs from outside. Braches that still have a lot of flexibility are easier to work with, but use what you have access to! Have your children clean up the branches, removing leaves and extra shoots. Or, ask your children to look at how they could use a funny curve or intersection to their advantage when forming letters.

Step 2: Have your children draw letter templates on white/copy paper. This will help make sure that all the letters in your branch alphabet are the same size. Make sure all your children's templates are about 6-inches at their tallest point, and no wider than about 5-inches. If your children desire an alphabet that is all different sizes, they can skip this step.

Step 3: Have your children use the template to cut the twigs to size using a good pair of shears. Scissors are not safe to use for this project since they are not intended for cutting wood. **Parents, make sure to supervise your child on this step!**

Step 4: Have your children tack letters together at each joint using your hot glue gun. **Again, adult supervision is mandatory on this step.**

Step 5: Have your children tack a piece of twine in place with hot glue at the back of the letter. They should wrap the twine around each joint of the letter and tack the end of the twine with hot glue again on the back to keep it in place.

Step 6: For curved letters like “S,” “O,” “Q,” and “U” you can tell your kids to wrap flexible “green” twigs around various-sized round objects and wrap them in place with rubber bands.
A gallon jug of glue was the perfect size for “O”and “Q,” and small spools left over from packing tape were the perfect size for wrapping the “S” and “U.” Leave the letters wrapped around the objects for as long as you can. We left ours for two weeks. The fresh twigs will dry in place during that time and stay bent in a curved position. If you don’t have access to “green” twigs, try soaking some older twigs in water to make them soft before wrapping them.

Enjoy the new autumnal addition to your home!
What are your favorite fall craft projects? Share your ideas on the Scholastic Parents Facebook page.
